Use our online designer studio to create your own personalised flyers, business cards, greeting cards and more.
Order NowWhen it comes to professional printing and advice on your business marketing, we are the team to call! You can call us direct on 04 568 8773 or fill in our quote form.
Request a Quote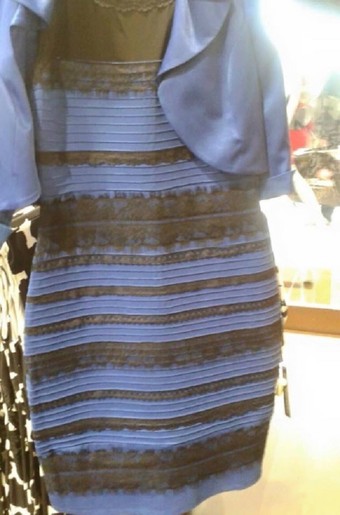
If you have even the remotest contact with the internet, by now you will have been sent a post, link, tweet, feed, etc about #thedress. The shear volume of debate about about if it’s white with gold lace or blue with black lace (spoiler – it’s blue with black lace) has made this a media sensation when in fact it just a case of some bad digital photography.
I won’t talk about the science about why different people see it in different ways or how the true colours were figured out, I’ve got links at the end of this article to pieces from experts who can explain it better than I can. Instead I want to talk about how to avoid something like this happening in the first place.
Lets break down some of the reasons for what happened, why it happened, and how to avoid it.
From what I can find online, the original photo looks like it was taken with a cellphone camera. Most cellphone cameras are quite simple devices with limited sensors and software for capturing images. Most people also don’t bother using the best quality mode as you don’t need it for ‘throw away’ shots and the files get expensive to send as mobile data. Combine these two sets of factors and you can get cameras that can be ‘fooled’ into seeing things incorrectly. The people who have analysed the photo at a pixel level see that when the image is correctly colour balanced that it is blue with black trim. It was the limitations of the sensors and software that caused the white/black balance to ‘flip’ turning black to gold and blue to white.
To stop that from happening, use a proper digital camera to take the shot. It doesn’t’ have to be a professional SLR, even a compact pocket camera will do a better job than most cell phone cameras because that is what they are designed to do while a cell phone is not. If you don’t have access to a proper camera, make sure you set your phone on to the biggest image size, with the best quality and set the mode to match the situation, ie ‘outdoors’ for outside, ‘portrait’ for people, etc.
The original shot was taken inside a store, which means that it was taken under artificial lighting. Now while you might think that all light bulbs make white light, in fact they don’t. If you look at the boxes for light bulbs you will notice that they are often described as being ‘warm’ or ‘cool,’ meaning the light is either got a yellow/red tint or blue/green tint. Our eyes are so good that they automatically colour correct for the tinting of the light, but cameras by default don’t – so colours will look different when you see the image on your screen.
Again using the specialty modes (indoor, outdoor, beach, etc) that most cameras have will help compensate for colour distortions. Specialty photo editing software will also allow you to run colour correction so white becomes white instead of cream or pale blue. Ideally you should avoid it in the first place by taking shots in natural sunlight light (mid morning or mid afternoon is the best) as that is the closest to pure white light that most people have access too.
If you look at the right hand side of the dress, especially at the top right you will see how overly white everything is. Looking at the dress you can see that range of colours from the brightest part to the darkest shadow is very limited, showing that it is in shadow. These two factors will confuse even the best digital camera in to making brightest point it sees as white and adjusting everything else to fall into what it expects to be the correct colour range. The camera is also relying on light that is first coming towards it, then reflected off the photographer, then reflecting off the dress, then reaching the lens, to work out the colour of the dress. This long reflecting path not only reduces the amount of light reaching the camera but each reflection alters the colour of the light.
Always take the photo with the strongest light source behind you, and if you can not do that try for the strongest light source to be at the side. You want the maximum amount of light being reflected off the subject to give the camera the best chance at correctly seeing the colours. If you can’t change the way the strongest light falls on the subject then force the camera to use its’ flash to provide ‘infill’ lighting that will illuminate the subject and force the background details to be ‘duller’ in the photo.
I could go on about the many other things you can do to avoid this colour shift problem when taking photos but the three I’ve listed above should deal with 99% of the causes. If you need advice on how to get the best photos for your next document or flyer, why not call Copy Express and we will be happy to help.
 41A Bay St, Petone