Use our online designer studio to create your own personalised flyers, business cards, greeting cards and more.
Order NowWhen it comes to professional printing and advice on your business marketing, we are the team to call! You can call us direct on 04 568 8773 or fill in our quote form.
Request a Quote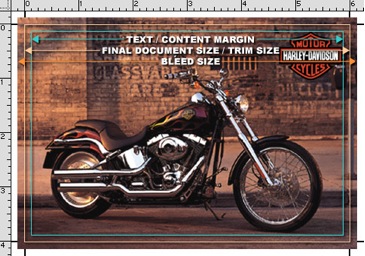
When designing your print job it is important to set it up correctly to get the best results. All printing has limitations, and designing for those limitations will make a job much easier to print and get better results.
Because it is not possible print to the edge of a page, and we cannot guarantee a precise cut at the edge of a printed image with no content loss, designing your file with bleeds and “safe zone” is very important if you want the appearance of edge-to-edge printing.
 If your printed design contains graphics, images or colors that go right to the edge of the page, your design must include a bleed. “Bleed” is a term used in printing for images or graphics that extend beyond the edge of the paper that gets trimmed off. In other words, these graphic elements “bleed off the page”.
If you want an A4 image (210 x 297mm) printed “full bleed” (that is, right to the edges), you should add 5mm to each edge that will be cut off. This will make your actual image size 220 x 307mm. When this is printed and cut down you will receive an A4 sheet of 210 x 297 mm. For image sizes of A5 and more we recommend 5mm of bleed. For smaller sizes (DL, A6 & Business Cards) we recommend 3mm of bleed on all edges.
| Page Type | Cut Size | Size with Bleeds |
| Business Cards | 90 x 55m | 96 x 61mm (3mm bleed) |
| A6 | 105 x 148mm | 111 x 154mm (3mm bleed) |
| DL | 99 x 210mm | 105 x 216mm (3mm bleed) |
| A5 | 148 x 210mm | 158 x 220mm (5mm bleed) |
| A4 | 210 x 297mm | 220 x 307mm (5mm bleed) |
| A3 | 297 x 420mm | 307 x 430mm (5mm bleed) |
Many applications will allow you to design in the target size and automatically handle bleed (Adobe Illustrator and InDesign allow you to specify the bleed size and will add this to the image when printing the final file; Microsoft Publisher will allow you to put images beyond the page edge and will give a 3mm bleed if you ask for it in the Advanced Print settings). If your application does not have this option then you may need to create a custom page size to handle it. Recommended page sizes are shown in the table to the right:
A safe zone (also known as a content zone, quiet zone, text zone or safety margins, etc) is an area of the printed page close to the intended cut line. While there can be background images and colour in the safe zone there should not be any text or critical images within the safe zone. Your safe zone should be at least 3mm from all edges. The reason for this is that all printers and guillotines have a 1mm drift tolerance. While it’s not normal to happen all at once it is possible that the page could drift by 1mm in the printer, and a further 1mm in the guillotine, and (if the page is double sided) a further 1mm in the front-to-back alignment, causing up to a total of 3mm. This is a normal part of printing and is largely unavoidable (we do alignment checks regularly to help minimize this.) To avoid the chance that anything critical is inadvertently cut you should leave a generous safe zone – at least 3mm. If you supply an image that appears to be full bleed but does NOT have adequate bleed, we will do one of the following:
The following example shows you the correct way to set up your image leaving a bleed zone and a safe zone.

If your image does not have proper bleeds and safe zone, you may get white edges, missing text or images cut too tight.

Although Copy Express makes every attempt to screen all artwork submissions, we cannot be held responsible for trimming errors. Please make sure your documents meet our specifications.
Many software packages handle bleed automatically if you set up your pages correctly. Let your artwork hang off the page and when you save in PDF format you may have the option of including bleed. Sometimes you may need to select a larger paper size to handle it (e.g., select A3 to hold an A4 with bleed). Including crop marks in your PDF with bleed is helpful to us – just make sure that they are outside the bleed area. We don’t need registration and file information. Also, please only layup a single image rather than ganging up for A4 or A3 paper (if you must, gang up for SRA3 most of the time – but we have software to do that).
If your software doesn’t handle bleed, you may be able to increase your document size to a custom size (like we must do in Photoshop). Don’t forget to increase the internal margin space to compensate (internal margin of 6mm on all edges is necessary to compensate for 3mm bleed and 3mm safe zone.)
OK – it needs to be said. Word is NOT an adequate tool for creating great flyers. If your document needs bleed then you have surpassed the reasonable capabilities of Word and need to move up to Publisher or something better. If you send us a Word document we will most likely have to charge you to convert it into something that is object based and can handle bleed. Be warned. No helpful instructions here beyond that! And don’t even get me started on Excel – step away from the computer right now and go find a rock and chisel – it’s easier! Excel is great for crunching numbers (I use it all the time) but horrible for creating reliable print-ready material.
Publisher handles bleed natively. Set your page size to the finished cut size and place your graphics over the edge of the page. In older versions of Publisher you will need a PDF print driver to create a PDF output. Make sure that you choose the Print Options and look for the “Allow Bleed” and “Crop Marks” options and check these. Please ensure that you are outputting a single image per page, not multiples (as this disables the bleed function). You will also need to print to a larger paper size than your final product (e.g., An A5 page should be printed on an A4 page). Newer versions of Publisher have a Save and Send function that allow you to output a PDF directly – just make sure that you find the bleed, crop marks and single-item options and check them all.
First of all, Photoshop is not the best tool to use for creating printable material. Go for Illustrator or InDesign if you can. If you must stick with Photoshop you will need to change the canvas size to include bleed on all edges (see chart above). Set guides for your intended cut zone and safe zones. When you output to PDF you won’t get crop marks – but we’ll add them later.
The amount of bleed is set in the Document Setup page. 3mm is normal, but 5mm is also OK especially for A4 pages. Make sure that your page size is set to the cut size (excluding bleed). When you go to output the PDF check “Crop Marks” from the Printers’ Marks section as choose “Use Document Bleed Settings”.
 41A Bay St, Petone