Use our online designer studio to create your own personalised flyers, business cards, greeting cards and more.
Order NowWhen it comes to professional printing and advice on your business marketing, we are the team to call! You can call us direct on 04 568 8773 or fill in our quote form.
Request a Quote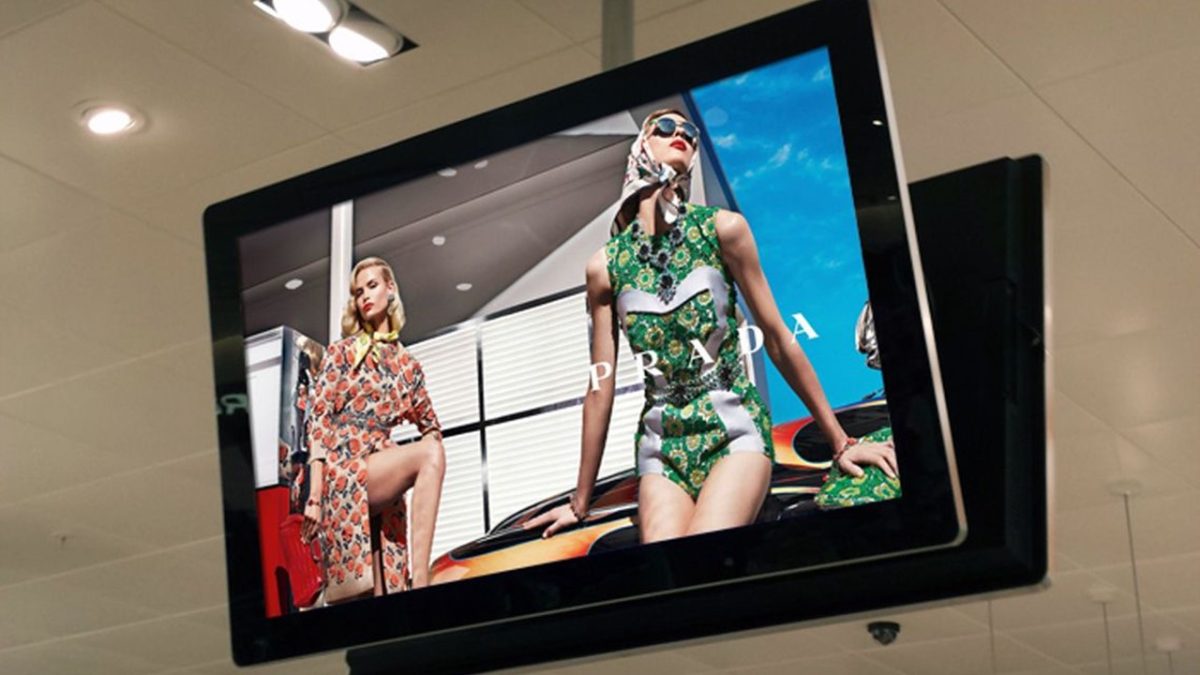
It’s becoming common these days for businesses to use video displays instead of printed signage to promote their business. There are many businesses out there that will sell you complex solutions with all the expensive bells and whistles to have a series of photos or videos to show on a large screen and pay a subscription fee to do so. The reality is that you can make your own basic system for a reasonable cost and do some of the work yourself. We are going to tell you how.
We know it sounds odd that a printing company would be giving you a guide on how to replace printed signage with a video display. We’re more than a printing company, we’re a marketing and design company, which includes creation of templates and the content for video displays. So let’s get going on how to make it happen.
A modern’ish smart TV, a USB flash drive, and some basic software on your computer. That’s it.
Most tv’s sold today are ‘smart’ devices, which means they are actually computers with a screen glued to them. As such you’ll see them equipped with USB ports, LAN sockets and even WIFI connections. Yes you could buy a high resolution computer screen or an expensive media display screen, but in most cases it’s overkill for what you need. You also need a basic storage device that you can load your images and videos on for the tv to display which USB flash drives are the cheapest and simplest solution. Depending on the software you built in to the TV you might not even need to plug in a storage device as it could pull the information from any computer, storage device, or even a cellphone on the same network.
In this article we will only talk about making a video display running on a usb drive as that is the simplest way to make it happen. If you want to learn about other options give us a call at Copy Express and we can work with you on that.
I’ve looked at various ways of doing this and here’s the one I feel is the most reliable for people. Most TV’s will handle playback of MP4 video files which means you can set up one video that you can navigate first thing in the morning on the tv’s remote and have it repeat the video in a continuous loop through the day. If your tv is more advanced you can create playlists of different videos or photos to display, or have it display the content of a folder with all the videos and photos within it. I personally still prefer using a single video as it makes it easier to control both the presentation and duration of each bit of information you want to show.
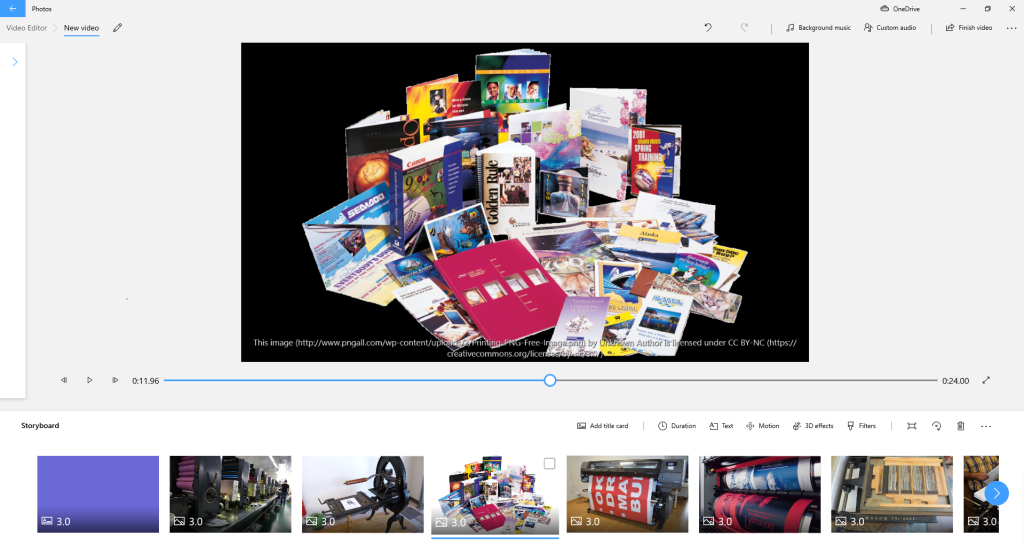
Both PC’s and Mac’s come with basic video editing software as standard, Photos in the Windows accessory menu, and iMovie app available from the Apple store. These are more than enough to put a series of photos and videos in a sequence, put text over them, and export a video file your tv can play. If you have Microsoft Office 360 or iWorks from Apple, you can use the slide show application (powerpoint / keynote) to export a video suitable for playback on a tv. There are several online design software tools to generate videos such as Canva, Adobe Creative Cloud Express video maker, and many many more. The main thing is that you need to check that it is able to export in 1080p or HD as that is the smallest resolution of most tvs and the 4k & 8k ones should scale the image up automatically. If the TV doesn’t support 1080 there are ways around it which I will explain later in this article.
I won’t go into too much detail on how to create a video itself as there are plenty of youtube videos that will step you through the process you will need to use for the software you’re using. Instead I’ll focus on a few key things to remember as you set your sides up.
Video displays are used for one of three purposes; advertising products or services, to inspire people to come in from the examples shown, or to explain what a service is. Advertising is simple enough, short and snappy clips with big text to highlight the deal the business is offering. Inspiring videos are to encourage people to learn more about the product and services the business provides. The purpose is to get around the classic problem of ‘I didn’t know you did that’ from potential customers not knowing about a business’s services. For example, a nail salon could have a video showing off the different types of nail polishes, finishes, shapes, art, etc. The final option of explaining is there to show people how things are done. Both to show a service and product and to remove any confusion about the product or service that prevents a potential customer from making use of it. These tend to have the longest videos and are more often mixed in between the other two types.
There isn’t enough time to build up a complex selling point to get a customer in the business, for you have at best five seconds before they move on (the 5-10-15 second rule or how quickly you’ll skip a youtube video). Be bright and bold with the design to catch people’s attention. If you aren’t sure how to do that, think about what grabs your attention when you watch a video or an advert and use the same idea for your own videos. Remember that you’re going to be visible in public spaces so don’t use rapid image changes or strobing light/colour effects. Not only is it annoying to those around you, but can trigger seizures or other problems in people with photosensitivity.
Do not use complex images or lots of text in your videos as they will be harder to understand the further away a viewer is. Better to use just 10 words instead of 40, use things like panning close ups mixed in with full shots on complex items to highlight details. Remember you have a short time to impart your sales pitch to someone so the simpler it is to understand the better.
Nothing gets more forgettable than a video that hasn’t changed in months. Every month or two months you should update the video to reflect the seasons and what new and interesting things your business has done. If your tv supports playing the contents of a folder or playlist, it’s even simpler as you can just add new videos and images into the flash drive and remove the old ones. It should be part of the same process you have for reviewing your social media pages and keeping them up to date. In many cases you can use the same images you post to Facebook or Instagram for your video display.
It should go without saying but people do forget this as they will put video with sound in or add music to a video because it makes it more interesting. This is fine for videos uploaded to youtube but on a video wall it’s adding extra noise to your place of business. If you do want to use your online videos on your display, make sure your tv is muted and don’t put anything on the USB stick that relies on sound to give the sell/inspire/explain more impact.
It doesn’t matter if your business is a trade or provides a service, unless you own the item you are showing on the video don’t put it on display. When you work for others they are paying for the final result and you don’t have permission to show it. If you get permission from them to show it, then be careful to never show anything that is personal information, ie a street address or contact information. If you are showing products in a retail situation, selling a shampoo for example, then the manufacturer of the product usually has video material you can use with their permission.
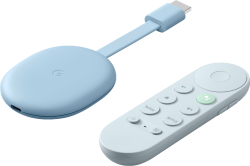
The tv might still have a LAN port or connect to a WIFI router, then you can store your videos on a computer on the same network and have the tv play them. It’s just a case of setting up the tv to see a computer’s storage as a folder and have it play the files from that. (See your tv’s user guide for more information.) If the TV doesn’t have that, streaming devices such as the Google Chromecast, Amazon Firestick and Dish TV’s smart tv unit can do the same thing instead of the tv and tuck neatly behind the screen. Lastly you can pick up specialised media playback units that sit under a tv to do the job, many of which have their own storage or read from a usb stick or harddrive for playback. A fair number of phones also support playback from themselves to a tv with the correct USB to HDMI adaptor cable, or streaming device, so if you have an old cell phone you can make it into a media player for your tv.
Black bars are a problem of the video not matching the screen it’s being played on. We’ve all seen portrait video that’s played back on a horizontal screen with the big black bars to the sides as the computer fits the image in the best it can. You can also get that from older style 4×3 recordings being shown on modern 16×9 screens where the image becomes 12×9 leaving blanks on the sides. To prevent this when creating your videos or photos, scale the image up to fit the 16×9 (1080p) ratio even if it chops off some of the image; you can always move the image up and down during the video to show everything.
Another reason could be that your tv isn’t able to scale the image up to fit the space. It could be because you’ve turned off upscaling (also known as dynamic scaling) in the tv menu options. Turning it back on can fix it. It could also be a case where the tv isn’t quite able to handle the video and images correctly, as there’s a lot of variations on the standards for them and most manufacturers will limit what they support. In those cases you might have to use a streaming device or reformat the videos and photos to the standards the TV understands (which is found in the back of the owner’s manual)
As mentioned in the previous point, there are a lot of variations of videos and image formats and not every TV supports display of them. Sticking with JPEG and MP4 is the most reliable, but occasionally you’ll still find ‘quirks’ because the manufacturer of the tv has decided to do something non-standard. Have a look at the back of the TV’s owner manual to find out what it supports and choose those matching settings when you save the files with the software you’re using.
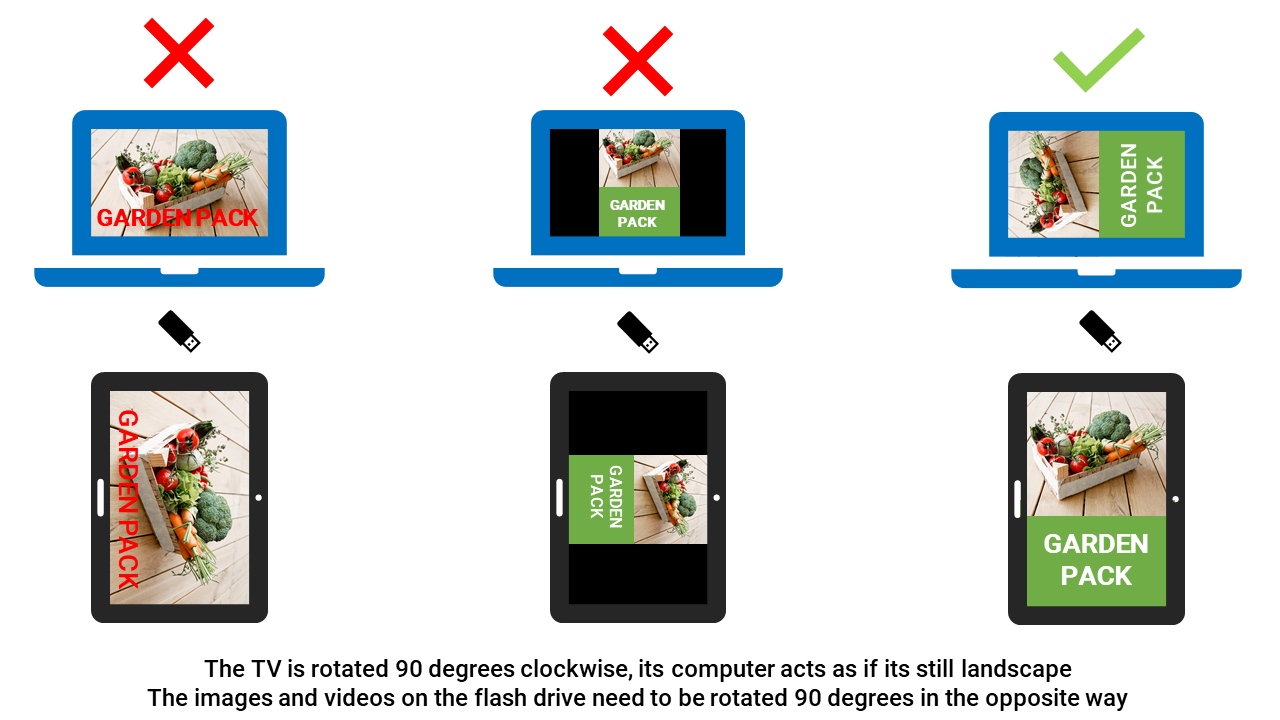
This seems to be the hardest thing for people to wrap their heads around, setting up files for use in a vertical display. While you can position your tv in any orientation you like, it still operates as if it was horizontal. So here’s how you set up your images or video to work for a vertical TV. You still use the normal landscape 1080 (16×9) size, you just need to rotate the art and text 90 degrees clockwise or anti-clockwise and make it fit on the screen. Below is graphics of how it should look
It can take a little time to get used to how to set things up to work on a portrait screen, but it will become easier over time.
We’ve covered all the basics you need to know about making video advertising displays. The technology is cheap and fairly simple to set up. It doesn’t take much in the way of technical knowledge or artist skills to make interesting displays. Just a bit of time and you’ll have something to grab the interest of people passing by your place of business.
But what if you don’t have the time, skill, or inclination to make your own video advertising display. This is where Copy Express can step in for you. Just book a time with us and we can do something as simple as setup templates for you to use in the software of your choice, up to doing all the work for you and emailing the finished file to you. Give us a call today to learn more.
 41A Bay St, Petone